Are you thinking about converting your old R12 air conditioning system to R134A but don’t know where to start? You’re not alone.
Many car owners face this challenge and worry about doing it right without damaging their system. The good news is, with the right steps and tools, you can make the switch smoothly and keep your AC running cool. You’ll discover a clear, simple guide on how to convert R12 to R134A, avoiding common mistakes and saving money in the process.
Ready to learn how to breathe new life into your AC system? Let’s dive in.
Credit: www.youtube.com
Differences Between R12 And R134a
R12 is a chlorofluorocarbon (CFC) refrigerant. R134A is a hydrofluorocarbon (HFC). This means R12 contains chlorine, which harms the ozone layer. R134A does not contain chlorine, so it is less harmful to the environment.
R12 has a higher ozone depletion potential. R134A has zero ozone depletion potential but has some global warming potential. This makes R134A a more eco-friendly choice than R12.
| Property | R12 | R134A |
|---|---|---|
| Chemical Type | CFC (contains chlorine) | HFC (no chlorine) |
| Ozone Impact | High ozone depletion | No ozone depletion |
| Pressure | Lower system pressure | Higher system pressure |
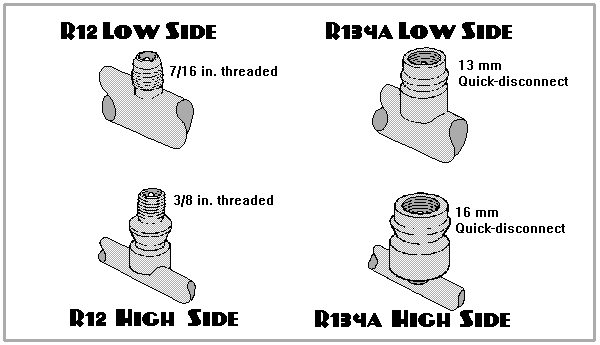
System pressure is different for both refrigerants. R134A works at a higher pressure than R12. This means some parts need changing during conversion.

Credit: www.amazon.com
Preparation Before Conversion
Gather all tools like refrigerant gauges, vacuum pump, and leak detector. Use R134A refrigerant with proper adapters. Safety is key. Wear gloves and safety glasses to protect your eyes and skin from harmful chemicals. Work in a well-ventilated area to avoid breathing fumes.
Check if the system works with R134A. Some parts may need replacement, like seals or hoses. Old mineral oils must be fully flushed out because they do not mix with the new oil. Use ester oil suitable for R134A systems.
Draining And Flushing The System
Start by safely removing all R12 refrigerant from the system. Use a proper recovery machine to avoid releasing harmful gases. This step is crucial for safety and environment protection.
Next, flush the system to remove mineral oil residue. Mineral oil does not mix well with R134A, so it must be fully cleaned out. Use a flushing agent designed for AC systems to clear oils and contaminants.
Clean every component thoroughly. Pay special attention to compressor, condenser, evaporator, and hoses. Dirt and old oil can cause damage and reduce cooling efficiency. Replace any parts that look worn or damaged.
Replacing Essential Components
Replace the dryer or accumulator to remove moisture and contaminants. These parts catch water and dirt to protect the system. Using the correct dryer is important for R134A compatibility.
Install an orifice tube or expansion valve designed for R134A systems. These control refrigerant flow and pressure. R134A needs different parts than R12 for efficient cooling.
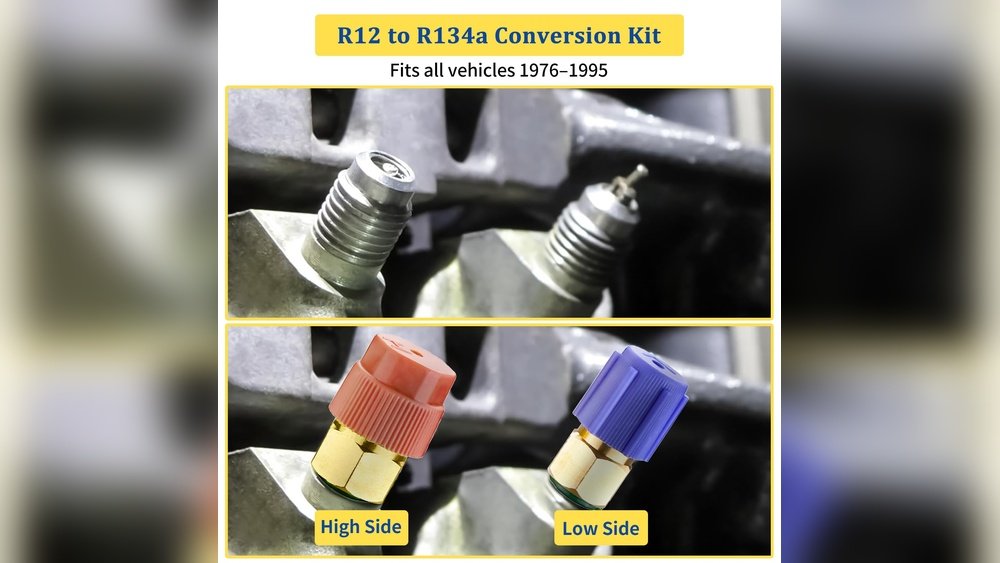
Upgrade seals and hoses to materials that resist R134A refrigerant. Old seals may leak because R134A molecules are smaller. New hoses prevent leaks and maintain system pressure.
Adding The Correct Lubricants
Switching to ester oil is essential when converting from R12 to R134A. Ester oil mixes well with R134A and keeps the system lubricated. It helps avoid damage to the compressor and other parts.
Before adding ester oil, fully drain the old mineral oil. This prevents mixing problems and poor lubrication. Flushing the system is often needed to remove all old oil traces.
Lubricate the compressor carefully. Add the right amount of ester oil based on the compressor type. Also, apply ester oil to other system parts like hoses and evaporators for full protection.
Credit: newoldcars.com
System Evacuation And Leak Testing
Pulling vacuum removes air and moisture from the AC system. Use a vacuum pump and connect it to the service ports. Run the pump for at least 30 minutes. Watch the gauge to ensure pressure stays low. If pressure rises, there may be a leak.
Checking for leaks is critical before adding R134A refrigerant. Use a leak detector or soapy water on all joints and hoses. Bubbles or detector signals show leaks. Fix leaks by tightening fittings or replacing parts.
Ensuring proper pressure levels helps the system work correctly. After vacuuming and leak testing, add the correct amount of R134A refrigerant. Use a pressure gauge to check high and low sides. Proper pressure keeps the AC cool and safe.
Charging The System With R134a
Measure the correct amount of R134A refrigerant before charging. Use a scale to weigh the refrigerant cylinder. This ensures precise charging and prevents overfilling.
Follow proper charging techniques. Connect the manifold gauge set to the system. Charge the refrigerant in the low-pressure side. Avoid charging on the high-pressure side to protect the compressor.
Monitor system performance during charging. Check pressure levels and temperature readings. Adjust the refrigerant amount to reach the recommended operating values. Ensure the system cools properly without leaks.
Post-conversion Checks
Check the cooling efficiency by measuring the air temperature from vents. It should be cold enough to cool the room properly. Compare the results with the system’s original specs to ensure it works well after conversion.
Listen carefully for unusual noises like hissing or banging sounds. These could mean leaks or parts not working right. Also, check for any strange smells or vibrations.
Perform routine maintenance often. Replace or clean filters regularly. Inspect belts and hoses for wear and tear. Keep the system clean and free from dust to maintain good airflow and performance.
Frequently Asked Questions
How Do You Convert R12 To R134?
Drain R12 refrigerant and flush the system to remove mineral oil. Replace the dryer and add ester oil. Install an orifice tube and adjust the evaporator pressure. Finally, vacuum the system and recharge with R134a refrigerant.
What Happens If You Put R134a In A R12 System?
Putting R134a in an R12 system without proper conversion causes poor cooling, compressor damage, and system leaks. Always flush, replace oil, and update components.
Can R12a And R134a Be Mixed?
R12A and R134a should not be mixed. Mixing reduces efficiency and can damage the system. Use proper conversion procedures instead.
What Is The Conversion Rate For R12 To R134a?
The conversion rate from R12 to R134a varies by system size. Typically, use 80% of the original R12 charge for R134a refrigerant.
Conclusion
Converting R12 to R134A requires careful steps and proper tools. Drain and flush old oil completely for best results. Replace the dryer to avoid moisture build-up. Use ester oil to protect the compressor during conversion. Pull a strong vacuum to remove air and moisture.
Check for leaks before adding R134A refrigerant. Follow these steps to keep your system running smoothly. Proper care helps your AC cool efficiently and last longer. This simple process saves money and protects the environment.
When you purchase a product through Amazon links on carsolutionpro.com, we may earn a small commission at no extra cost to you. This helps support the site and keep our content free. As an Amazon Associate, we earn from qualifying purchases made through our links.